You finish filming something you’re happy with, then spend four minutes scrolling for the one that makes it look finished. You pick one. It looks better on the preview screen. You post it.
Nobody ever tells you whether it helped. TikTok filters are the production decision creators make most often and verify least, and one category of them carries a cost that shows up nowhere in your view count.
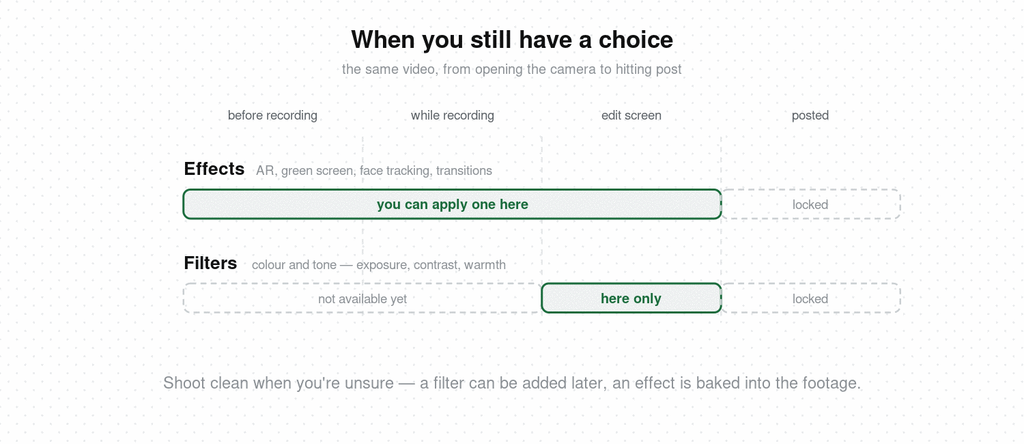
TikTok uses both words loosely, and the difference is worth knowing because it changes when you have to commit.
Filters adjust colour and tone — saturation, exposure, contrast, warmth. They live in the right-hand menu, and you can only apply them after recording or uploading. You’re grading footage that already exists.
Effects sit behind the button to the left of the record button and work before or after recording. They add something that wasn’t there: AR overlays, green screen, face tracking, transitions, interactive elements viewers respond to.
So an effect is usually a decision you make before you shoot, and a filter is one you can reverse any time before you post. When you’re unsure, shoot clean. A filter can always be added later. An effect is baked into the footage.
Sort every option by which job it’s doing and the choice stops being a scroll.
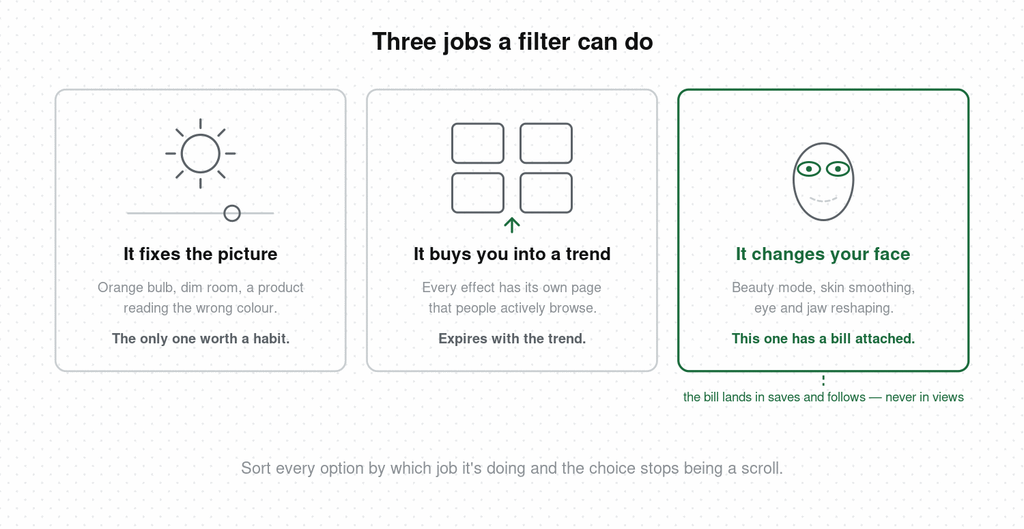
It fixes the picture. Your kitchen bulb is orange, the room is dim, the product’s colour reads wrong on camera. A tone filter corrects it. This is the only category worth using out of habit — and it’s worth knowing that a filter corrects colour, never light. If the shadow down one side of your face is hard, the fix happens before you hit record, with a white t-shirt or a sheet of printer paper, and no amount of grading afterwards replaces it.
It buys you into a trend. Every effect on TikTok has its own page listing videos that used it, and tapping the effect name on any video takes viewers there. Using a trending effect puts your video on a surface people are actively browsing. That’s a real, if temporary, distribution route, and it expires the week the effect stops being interesting.
It changes your face. Beauty mode, skin smoothing, jaw and eye reshaping. This one has a bill attached, and the bill arrives somewhere you’re probably not looking.
I’ve been shooting and posting video for about ten years, and running social accounts for other people alongside that. Across both, the same pattern holds: showing your face beats hiding it, visible eyes beat obscured ones, and eye contact with the lens beats a gaze that drifts.
The part that took me a long time to notice is where that difference lands. It barely touches views. Views are decided by the hook — a video where nobody looks at the camera can still travel a long way on a strong opening. The difference shows up entirely in saves, follows, profile taps, DMs, and comments written as though addressed to a person.
Heavy beauty filters work on exactly the features carrying that signal. They smooth the micro-expressions around the mouth and enlarge and flatten the eyes. Your view count won’t flinch. The number of people who felt spoken to will.
That doesn’t make beauty mode useless. It makes it a dial with a real trade-off, and most creators run it near the top because the preview screen is flattering and nothing in their analytics ever objects.
Somewhere in your saved videos is a creator whose footage looks clean and still looks like a person. Hookova is built for exactly that moment: save any TikTok, Reel, or Short in one click, then analyze the one you want and get it broken down piece by piece — framing, lighting, pacing, where the eyeline sits — so a look you liked becomes something you can actually reproduce.
You film products, for brands or your own shop. Colour accuracy is the job. A warm filter that flatters your kitchen also turns a beige product cream, and “this isn’t the colour in the video” is a comment that costs real money in returns. Grade the footage, then put the actual product next to your screen and check before posting.
You’re the face of the account. Fix the light and keep the face. If you’re using beauty mode, drag it down far enough that your expressions still read, then leave it there permanently so your videos look like one continuous person. Everything about holding the camera’s eyeline depends on the eyes surviving the edit.
You run a restaurant, a salon, a gym. Pick one filter and use the same one on every video, forever. Food filters push saturation hard, and a customer who arrives to a dish that looks different from the video is a bad review waiting to happen. Consistency also does something for you: a profile grid that looks like one place reads as a real business.
You run faceless accounts, several at a time. None of the face problems apply, so treat filters as a batching decision. Lock one grade per account and apply it to everything, so footage pulled from five different sources still looks like it came from one channel. Keep the chosen filter in Favorites and the choice stops costing you time on every upload.
You make skits. Effects are production equipment here, and they earn their place. Green screen gives you a location you can’t afford. Face tracking gives you a second character when you’re filming alone. A transition effect covers the cut you had no way to shoot. Decide these before you roll, because they’re part of the blocking.
Filters get evaluated by how the preview looks, which is why nobody catches the cost. Run this instead, once.
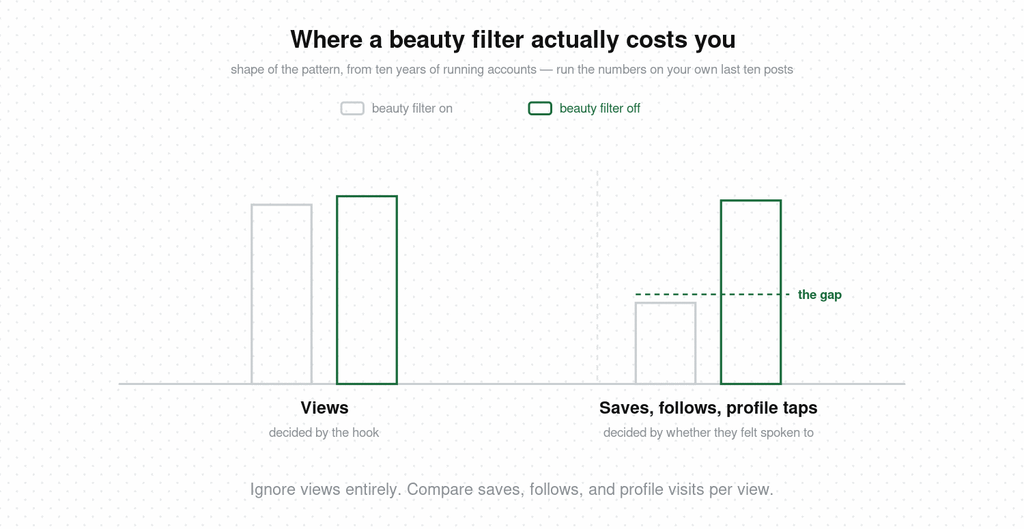
Take your last ten posts. Split them by whether beauty mode was on. Ignore views entirely — compare saves, follows gained, and profile visits per view. If the filtered half is behind, you’ve found something real, and it was invisible on every screen you were looking at. Adding this to your pre-post checks takes about two minutes a month.
How do you find filters on TikTok?
Tap the plus button, record or upload your video, then open the Filters menu on the right side of the editing screen. Filters are grouped into categories like Portrait, Landscape, Food, Retro, and Film. Effects are separate — they sit behind the Effects button to the left of the record button, and you can apply those before recording.
What’s the difference between TikTok filters and effects?
Filters change colour and tone only — exposure, contrast, saturation, warmth. Effects add new visual elements such as AR overlays, green screen backgrounds, face tracking, and transitions. Filters can only be applied after you record or upload; effects can be applied before or after.
Can you add a filter to a TikTok after posting it?
No. Once a video is published, the footage is final. You’d need to delete the post and re-upload the edited version, which loses all accumulated views, likes, and comments. Check your grade on the preview screen before publishing.
Do TikTok filters affect video quality?
Tone filters have minimal impact. Heavy AR effects and beauty smoothing can soften fine detail and introduce artefacts around hair and edges, which is more noticeable in low light. Recording in good light gives any filter better material to work with.
How do you remove a filter from a TikTok video?
Before posting, reopen the Filters menu and select “None” or slide the intensity to zero. Effects are removed from the same panel where they were applied. After posting, neither can be changed.
Why did my TikTok filter disappear?
Effects are removed regularly — when a licence expires, when a creator takes down a custom effect, or when the platform retires it. Videos already posted with that effect stay intact, but you can’t apply it to new footage. Save effects you rely on to your Favorites, and expect trend-based ones to be temporary.
The filter is the last five percent. What decides whether a video works is everything upstream: the opening frame, what the first line does, where the camera sits relative to your eyes. Hookova breaks a finished video down second by second so you can see those choices in the ones already working in your niche. For the full range of opening techniques it recognizes, see the video hooks guide.
 Hookova