TikTok editing goes fast when the decisions are made before you open the editor. My workflow: pick one viral video to learn from, get its cut list (every shot’s length, text and camera move) from Hookova in about two minutes, shoot to that list, then cut in CapCut at the same beats. Captions come from the transcript, sound from a free library, the cover from a frame grab. A six-minute vlog used to take me 6 to 8 hours. Now it’s under an hour.
That’s the whole answer. The rest is why it works, with the steps and the tools at each one.
Nobody warns you about this part. You film for an afternoon, open the editor, and three hours later you have forty seconds. The problem is the footage, and how much of it there is.
Pure manual editing means watching everything you shot, start to finish, before you cut anything. Four hours of footage is four hours of watching, minimum, and that’s where the time goes. The cutting is quick once you know where the good moments are. Finding them is the job.
Reddit is full of people hitting the same wall. One creator on r/VideoEditing put it plainly: “It’s way too slow editing on my phone”. Another, sitting on a year of travel footage, wanted to post it to TikTok and had no idea how to start editing. Same problem from two directions: too much footage, no plan for it.
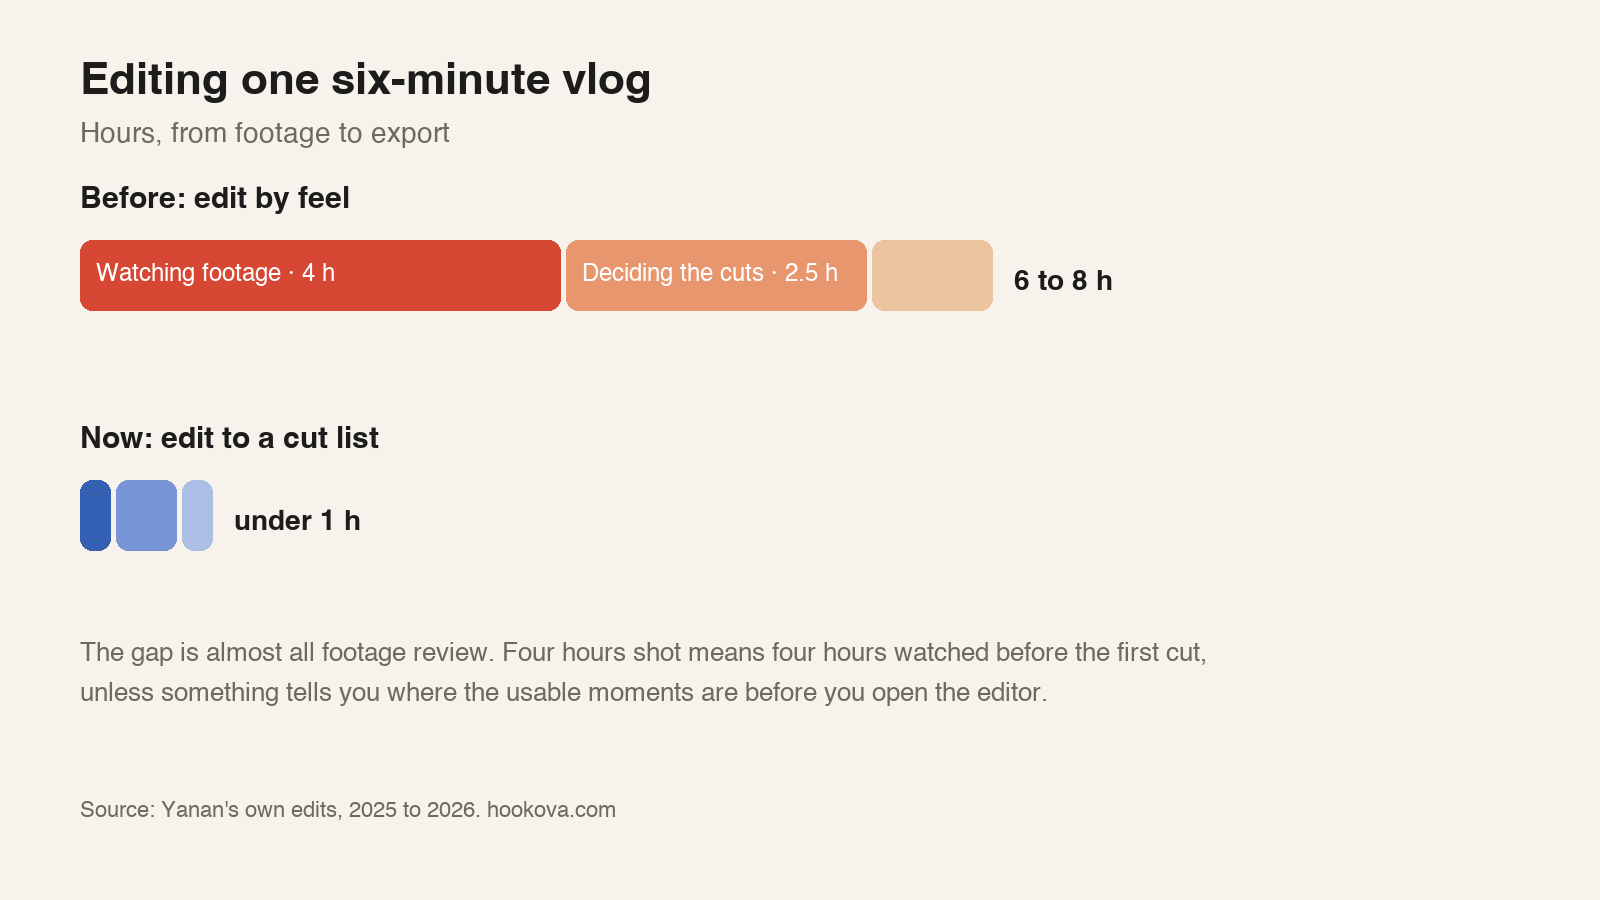
My own numbers, for honesty’s sake. A six-minute vlog, cut down tight for TikTok, took me 6 to 8 hours when I edited by feel. The same job now takes under an hour, and the difference is one thing: I start with a cut list.
A cut list is the plan a professional editor works from. Which shots, in what order, how long each one runs, what text sits on top. Film editors have had one for a century. Most TikTok creators haven’t seen one, so they make every one of those decisions live, in the editor, with the clock running.
Two things fix this, and both are AI jobs now.
The rough cut. An AI assistant can go through your footage in slices, work out what each stretch is about, pull the moments that belong to the story you’re telling and leave the rest. It can sort the clips into folders, write up what’s in each one, and hand you a first pass. You still make the edit. You just stop watching four hours to find six minutes.
The reference. This is the part I care about most, and it’s what Hookova is built for. You find a video that already works, the one you’d like yours to feel like, and Hookova breaks it into a storyboard: the hook type, every shot’s length and size, where the text sits, how the camera moves. That storyboard is a cut list. Then you shoot and cut to it.
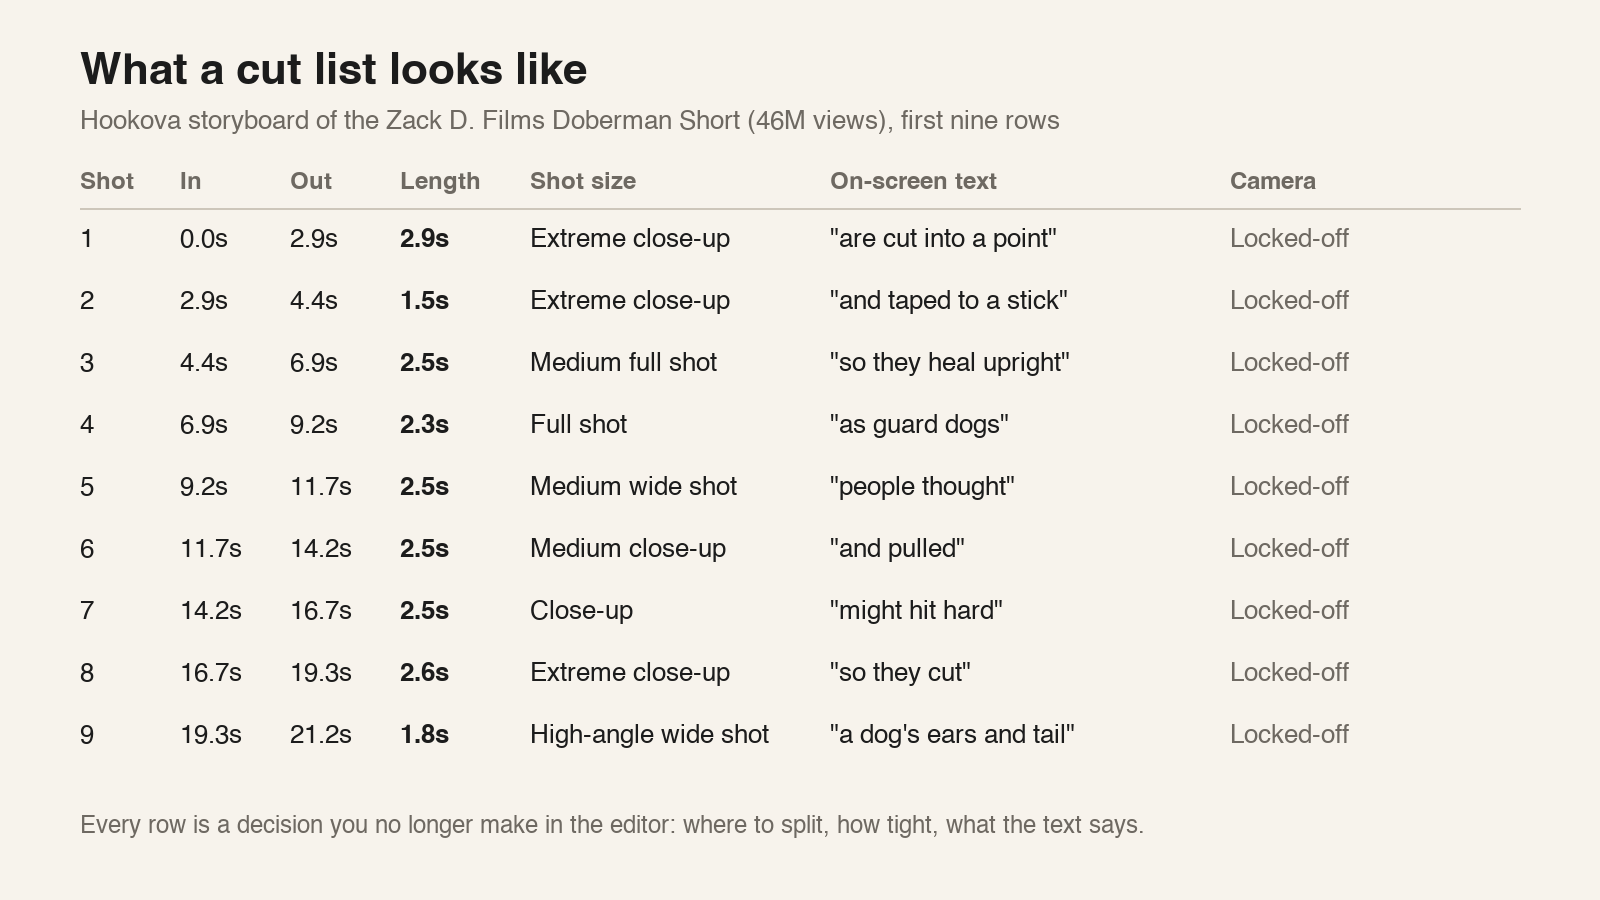
That table is the first nine rows for a Zack D. Films Short that did 46M views. Every shot runs about 2.5 seconds, the text is two or three words a row, the camera never moves. You could cut a video to that rhythm tonight. The subject would be yours, the pacing would be his.
One rule I hold to: borrow the pattern, never the content. The footage, the lines, the captions all stay with the original. What you take is the structure.
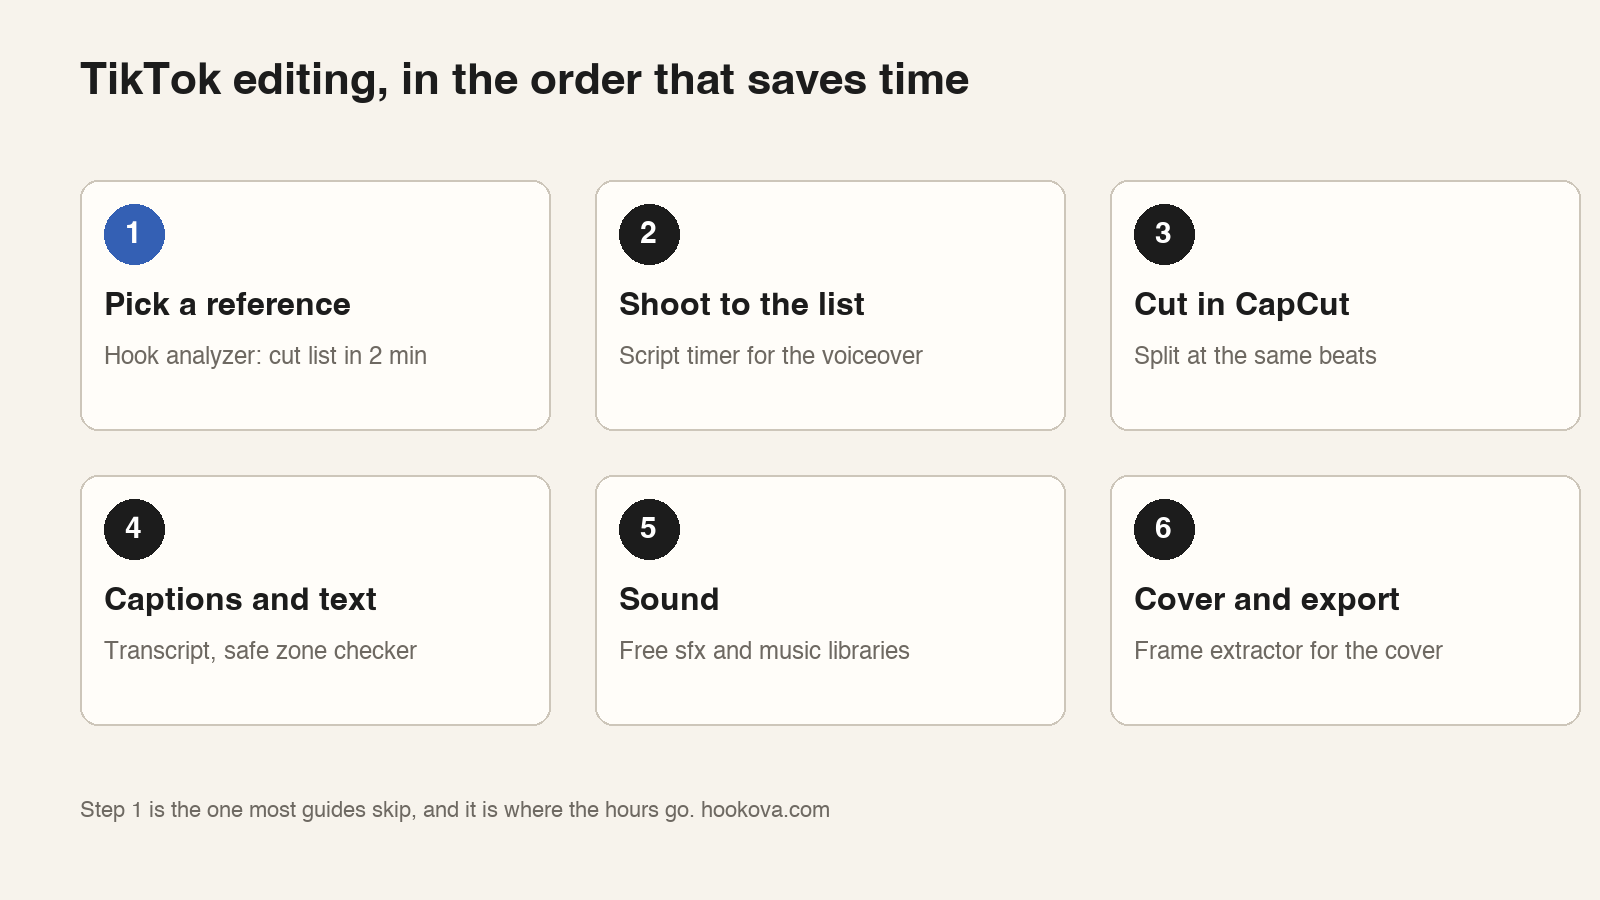
1. Pick a reference and get its cut list. Paste the TikTok, Reel or Short into the Hookova hook analyzer. About two minutes later you have the storyboard above for your own reference. Your first three credits are free. Look at three numbers before anything else: how long the first shot runs, how many shots fit in the first three seconds, and how many words are on screen at once.
2. Shoot to the list. You now know the shot count, so you know when you’re done filming. For a voiceover, paste the script into the script timer first. Most TikTok hooks land in the first 8 to 12 words, so if your opening line times out at four seconds, cut it before you record it.
3. Cut in CapCut at the same beats. Import, set the ratio to 9:16, then split where the cut list says to split. The first three seconds get the most attention: match the reference’s shot lengths there exactly, even if the rest drifts. I do this on my phone. A lot of creators only get the feel right on the phone, and CapCut’s mobile editor handles splits, speed ramps and overlays without complaint. The overlay walkthrough covers the picture-in-picture part.
4. Captions and text. Run your finished cut, or the reference, through the video transcript tool and you have the caption text with timing. Place it where the storyboard says the reference placed it, then check the frame in the TikTok safe zone checker. The bottom 500 pixels and the right 160 belong to TikTok’s UI, and text that lands there disappears on the feed.
5. Sound. Hookova’s music library has 1,442 tracks and the sound-effects library has about a thousand short clips, both free to download, both reachable from an AI assistant. Match the reference: if its cuts land on a beat, pick a track with a clear beat and line the splits up to it.
6. Cover and export. Pull the cover frame with the frame extractor and skip the scrubbing. Export at 1080 × 1920, 30 fps, high bitrate, and upload from the camera roll.
Here’s where TikTok editing gets faster still. Hookova has an MCP server, which means Claude, ChatGPT or Codex can use it directly. You connect once, then you can say things like “pull the hook guide from my board”, “find me a whoosh under half a second”, or “recommend a track for a fast-cut cooking video”, and the assistant fetches it from Hookova’s libraries and your own analyses.
In practice my phone edit now looks like this. The assistant has the reference’s storyboard and my brief. It tells me the shot order and the target lengths. I cut in CapCut to those numbers. It hands me the captions from the transcript and two sound effects for the two hard cuts. I drop them in and export. The thinking happened before the editor opened, which is the whole trick.
The fully automatic version exists too. Automated Content takes a product brief and returns a finished promotion video, no editor at all. For a brand clip that’s often enough. For a personal video, I still want my hands on the cuts.
“Stop perfecting, start posting” is the standard advice, and it’s half right. The reason people over-polish is that they have no standard to measure against, so every version looks wrong in a new way. A reference storyboard is the standard. When your first shot runs 2.8 seconds and the reference’s ran 2.9, you’re done with that shot. Move on.
That’s the real change in my TikTok editing. Cutting by feel is an open loop. Editing to a cut list is a checklist, and checklists finish.
Can I edit a TikTok after posting it?
Partly. Tap the three dots on your posted video and choose Edit post to change the caption, cover, hashtags and mentions. The video file itself stays as uploaded. To fix a cut or a caption inside the video, re-edit it in CapCut, delete the post and upload again. Every platform works this way.
What do most TikTok creators use for editing?
CapCut, on the phone. For TikTok editing inside the app, the built-in editor handles trims, captions, overlays and speed. CapCut adds masks, keyframes, multiple overlay tracks and a much bigger preset library, and exports a file you can post anywhere.
How long should TikTok editing take?
With a cut list, a 30-second video takes me 20 to 40 minutes from import to export. Without one, plan on two hours and a lot of second-guessing. The watching is what eats the time, so anything that tells you where the moments are before you start pays for itself.
Should I edit in the TikTok app or in CapCut?
TikTok’s app for a single clip with captions. CapCut for anything with more than one layer, a mask or a cover you care about. CapCut also saves the project, so you can fix and re-export when TikTok inevitably asks you to.
Want the cut list for a video you admire? Paste any TikTok, Reel or Short into Hookova and get the storyboard, with every shot’s length, text and camera move, in about two minutes. Your first three credits are free.
 Hookova