A TikTok overlay is a second video or photo sitting on top of your main clip. Picture-in-picture, basically. You can make one three ways: inside the TikTok app (upload your clip, tap Edit, then Add overlay), in CapCut (the Overlay tab, which is the one I use), or straight out of the camera on an iPhone 17, which records front and back at the same time. The window goes anywhere you drag it. Keep it out of the bottom quarter and the right edge, where TikTok draws the caption and the buttons. That’s it.
That’s the short version. The rest is what I wish someone had written down when I started.
Open Reels and count. Before/after. “What I saw” in a small window, “what I made” behind it. “How they shot it” on one side, “how I shot it” on the other. These comparison formats are everywhere this year, and they do well for a simple reason: one frame carries two pieces of information, so the viewer gets the comparison without waiting for a cut.
Apple noticed too. The iPhone 17 camera records front and back at the same time and drops the second one in as a window. When the phone does it by default, the format is no longer a trick. It’s just how videos look.
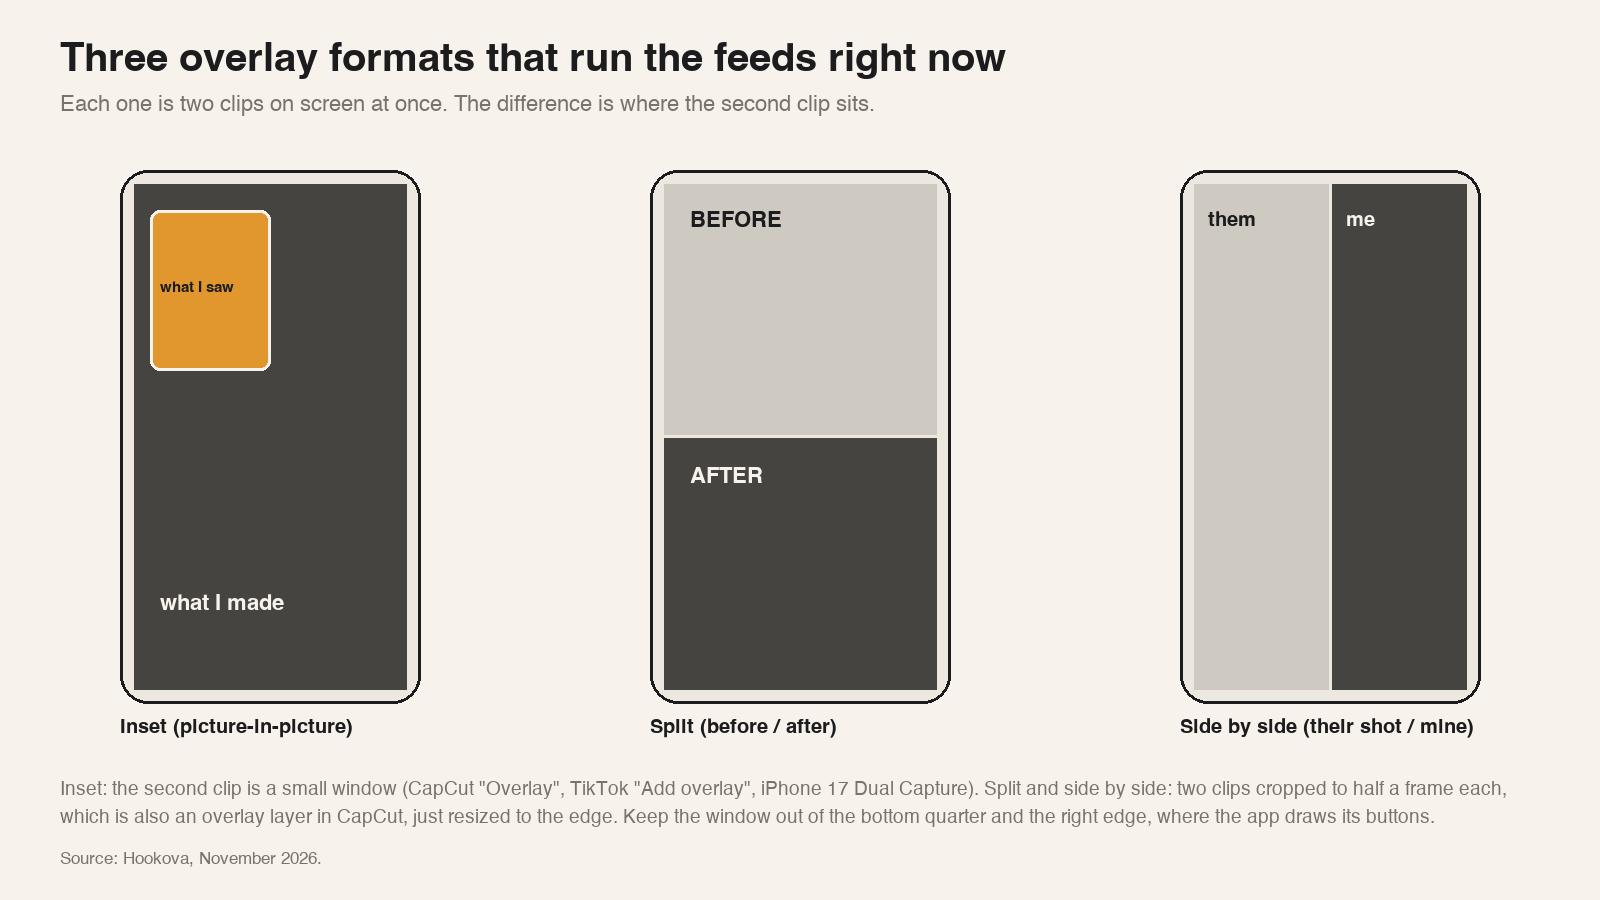
I’ll be honest about where I started. The first time I needed one, I had no idea how people were doing it. I assumed it was a special app. It’s one button in whichever editor you already have, and the only real decisions are which editor and where the window goes. Both below.
TikTok’s own editor can do it, and it’s fine for a quick one.
Menu names move around between app versions. Older builds tuck the same thing under Edit or Stickers, so look there if the toolbar doesn’t show it. The limits are what you’d expect from a phone editor: one window at a time is easy, three is fiddly, and there’s no mask, so your window stays a rectangle.
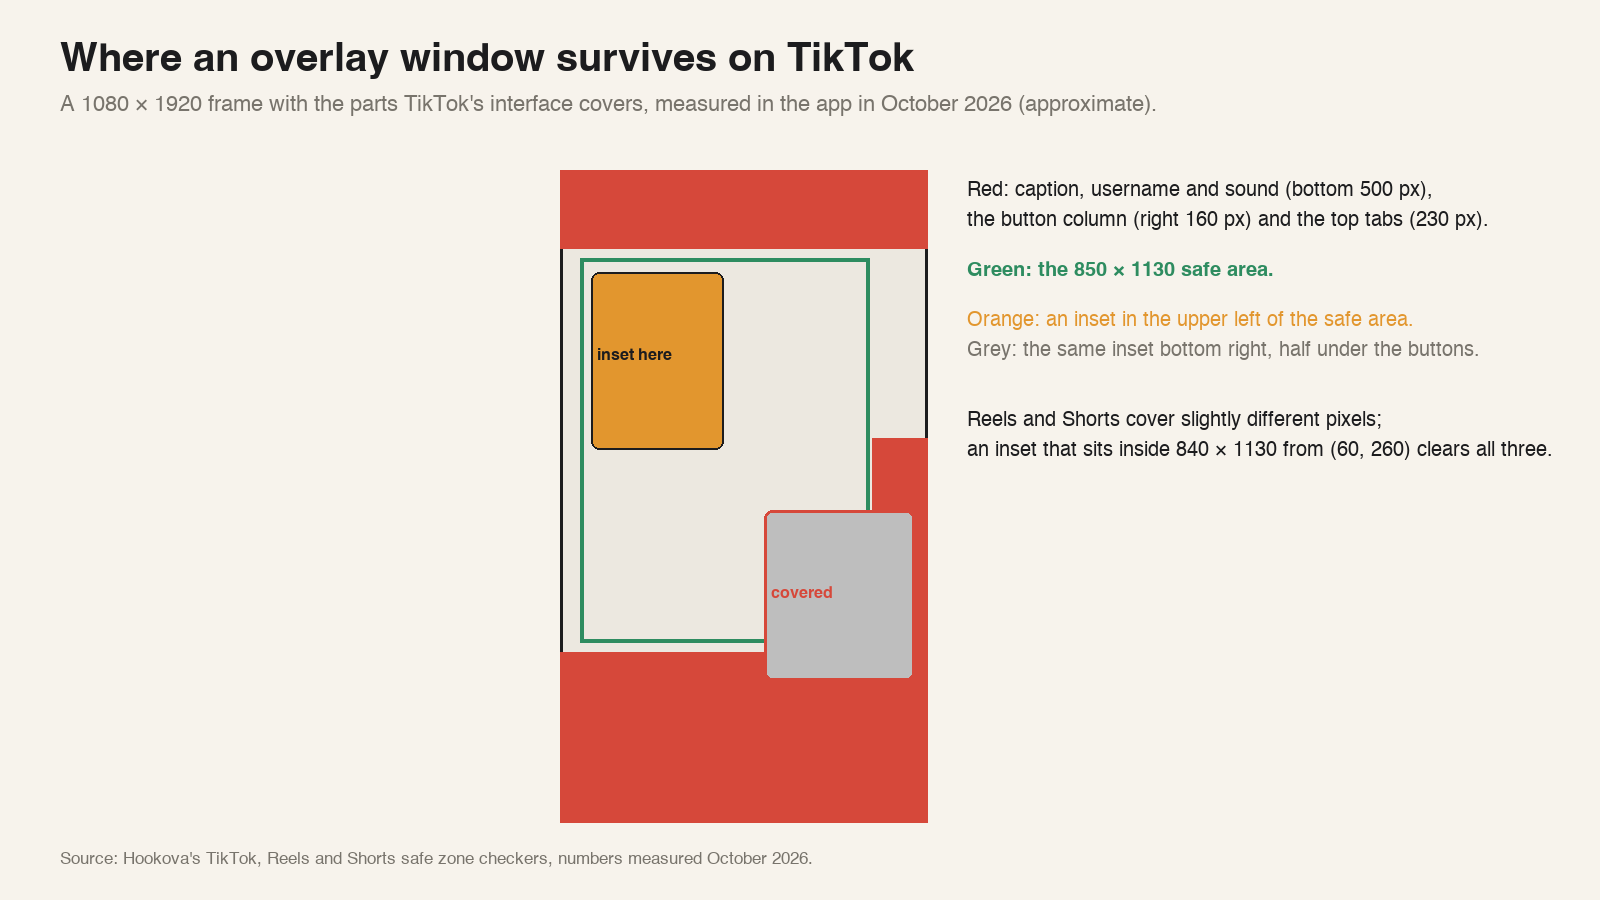
The one thing to check before you post: scrub to the end and look at where the window sits. TikTok’s caption, username and sound line cover roughly the bottom 500 pixels of a 1080 × 1920 frame, and the like, comment and share buttons cover a column about 160 pixels wide on the right. A window parked bottom right is half gone the moment the video is live. The free TikTok safe zone checker draws those areas over your video so you can scrub through and see it before TikTok does.
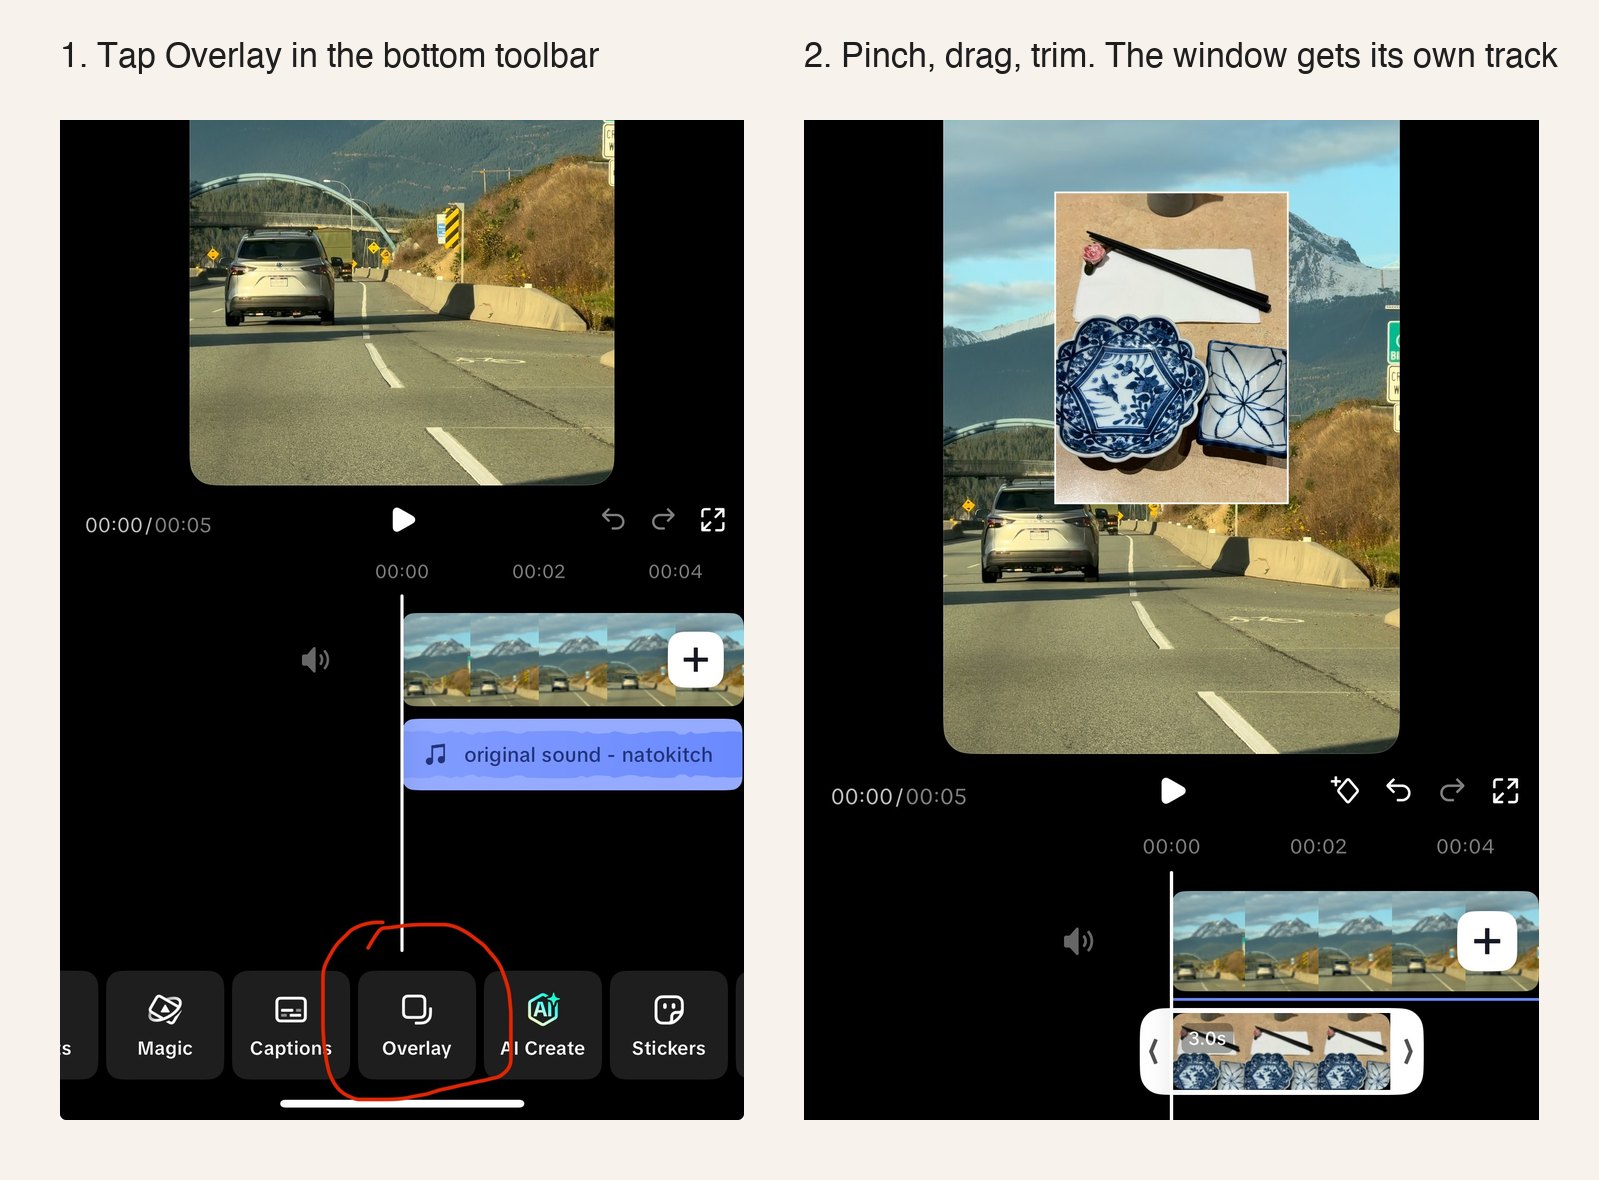
CapCut calls picture-in-picture an overlay, and it’s the better tool for anything you’ll post more than once. Same company as TikTok, so the export lands clean.
On the phone:
On desktop it’s the same idea with tracks: import both files, drag the second one onto a track above the first, and resize it in the player.
Three reasons I build a TikTok overlay in CapCut. Masks, because a rounded window reads as a design choice and a hard rectangle reads as a screen recording. Stacking, because a before/after/after needs three layers and TikTok’s editor hates that. And the presets: PNG frames, transparent stickers, arrows, the “what I saw” labels. CapCut’s library has far more of those than the TikTok app, and they drop straight onto an overlay track.
Instagram’s Reels editor has an overlay option under edit, and I find it clunky. Timing the window is awkward, and in 2026 the photo-overlay path got harder to find after Instagram moved that kind of editing into its separate Edits app. Edits does video-on-video properly, with layers you can trim and reposition.
My take: if you’re already in CapCut, stay there and upload the finished file to Reels. If you only post to Instagram and want to stay inside Meta’s apps, use Edits. Skip the Reels camera.
Apple’s Dual Capture records the front and rear cameras at the same time and composites the second one as a movable window. It’s in the Camera app on iPhone 17 and later, and it skips the editor entirely for reaction-style videos: you talking, the thing you’re reacting to behind you.
Two limits. You position the window before and during recording, and once you stop, it’s baked in. And it’s one window, so a before/after still needs CapCut. For “me plus what I’m looking at”, though, it’s the fastest overlay there is.
Here’s the part the TikTok overlay tutorials skip. The feeds don’t want the same thing.
Reels is where the comparison formats live. Before/after and “what I saw / what I made” get their numbers there, and the window can be small, because people on Reels will look at it.
TikTok doesn’t really reward a small window. The TikTok feed runs on big text and a fast first second, and the overlays that work there are large: a window that takes half the screen, or a full-frame cut between the two clips with a word over each. If you’re making one video for both, make the window big and the text bigger. It’ll work on Reels too. The small, elegant version only works one way.
The quickest way to see this is to look at what’s already winning. When I run a comparison video through Hookova, the storyboard shows every row with where the text sits and when the second clip comes in, which is the layout decision in numbers. The two breakdowns we published this week make the point on their own: the Zack D. Films Short is one full-frame animation with two-word captions and 46M views, while the Microsoft layoff Reel keeps a title card in the upper frame for 23 seconds, clear of the caption. Same rule, different platforms.
One more thing on assets. Hookova’s library of sound effects and music, and image generation for a label or a frame, are all reachable from your AI assistant through the MCP server, so you can pull an overlay’s sound or a title graphic without leaving the chat you’re planning in.
Some people searching this mean the interface itself: a transparent PNG of TikTok’s buttons and caption bar to lay over an edit, so you can see what gets covered. That’s a real need and it’s a different thing from picture-in-picture. The TikTok, Reels and Shorts safe zone checkers do it on a video, scrubbing frame by frame, and each one exports the blank template if you want the PNG for your editor. If you need a still from a video to check, the frame extractor pulls one in your browser.
For what to write on the overlay once it’s placed, that’s a separate post: text overlay, and what to say when the sound is off. And for the export sizes every platform wants, social video sizes has the one table.
Can you overlay a video on TikTok without another app?
Yes. Upload your main clip, tap Edit, then Add overlay, and pick a video from your camera roll. You can resize it, trim when it appears, and lower its sound. For masks, more than one window, or presets, use CapCut.
What size should a TikTok overlay be?
There’s no fixed size. Keep the window inside the middle of the frame, away from the bottom 500 pixels and the right 160 pixels of a 1080 × 1920 video, because that’s where the caption and buttons go. On TikTok specifically, bigger reads better: half the screen or more.
Does the TikTok overlay work with sound from both clips?
It does, and you can set each clip’s volume. In most comparison videos the main clip carries the audio and the overlay is muted, or the other way round for a reaction.
Can the iPhone do a TikTok overlay without editing?
On iPhone 17 and later, yes. Dual Capture in the Camera app records front and back at once and places the second camera as a movable window. It’s one window and it’s baked in once you stop recording, so for before/after you still need an editor.
Want to see how a comparison video is built, shot by shot? Paste any TikTok, Reel or Short into Hookova and get the storyboard, with the text and the second clip’s timing on every row, in about two minutes. Your first three credits are free.
 Hookova